Contents
Changing A Sewing Machine Needle
Hello guys!! Today we are about to see how to change a sewing machine needle, which is not as hard as it sounds. If you happen to see broken stitches or get tangled a lot, then it is high time to change your needle. This should be your basic step to sort out such problems but if it still prevails, you’ll have to check with your customer service.
Through my personal research I have found that a needle can last for 5 hours of stitching. If you don’t replace the needle in the right time it might damage the bobbin case. One should remember using a defective or worn needle too causes stitch skipping and snapping of thread. So either way the best option is to change the needle.
Types Of Needle
It is quite important to choose the type of needle as much as changing it. Sewing needle has to be chosen in accordance to the type of fabric that is going to be stitched.
Smaller sized ones are best for lightweight fabrics (example: linen) while the larger sized ones are best for heavy weight fabrics (example: curtains)
How To Choose The Type Of Needle

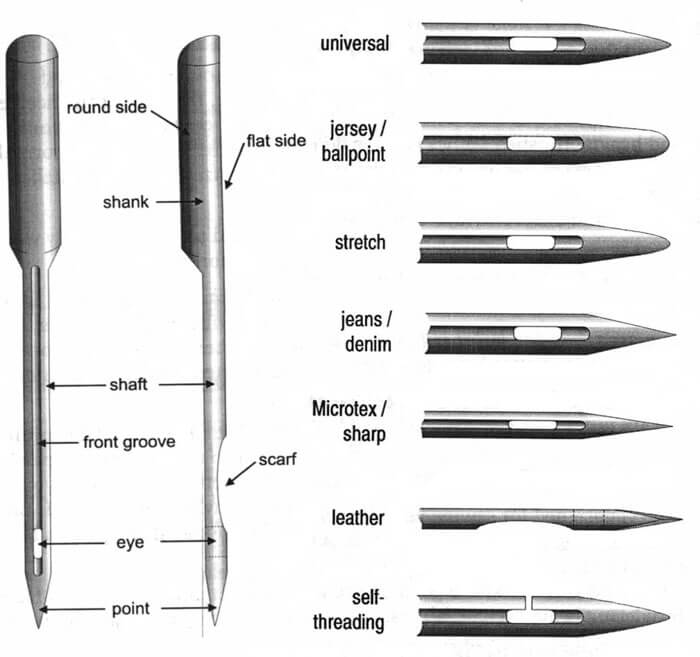
There are different types of needle that has to be used with the specific type of thread and fabric in order to get the proper outcome. I have managed to gather these basic types of needles which could help u choose the best needle for your next stitching operation.
1. Universal
This is the “general purpose” needle. It has a rounded tip and can be used for any basic stitches.
2. Jersey And Stretch
Both the needles have a medium ball point tip which helps in prevention of damage to the materials used. Jersey needle is an excellent choice for knits while stretch needle as the name denotes can be used for stretchable materials like swimsuit.
3. Jeans
Jeans needle contains of a modified ball point and a thick shank which helps it to penetrate into extra thick materials without breaking or bending of the needle. These Jeans, canvas, quilt layers can be considered as examples for materials that can under for a jeans needle.
4. Microtex
This needle is also called as “sharp” since it is quite thin and has a sharp point. It is perfect for silk, fibre, polyester etc. The sharp point serves perfectly straight stitches.
5. Quilting
Quilting has a rounded point tip and it is specifically designed for machine use and quilting. One can achieve easy penetration and elimination of thread breaking or skipping of stitches with this sort of needle in a machine.
6. Specialty Needles
There are wide types of needles under specialty needles. Some of them are as follows.
Embroidery and metallic needles which are used in embroidery designs, these typically save the embroidery threads from breaking which in turn results in proper and desired designs.
Leather needles have a special cutting point(a small blade) which helps it to penetrate leather and artificial leather materials, such needles should not be used on light weighted fabrics cause the cutting edge may worn out the materials.
Topstitch needles is meant to have a larger eyehole which allows thicker threads to pass through them seamlessly and as the name depicts they are perfect for topstitching purposes.
Mentioned above are just few types, though you can Google if you want to know about any specific types of specialty needles.
How To Change The Needle
Now that we are much aware of what needle that you are going to choose for your fabric, we are further going to look into the process of changing the needle.
Step 1

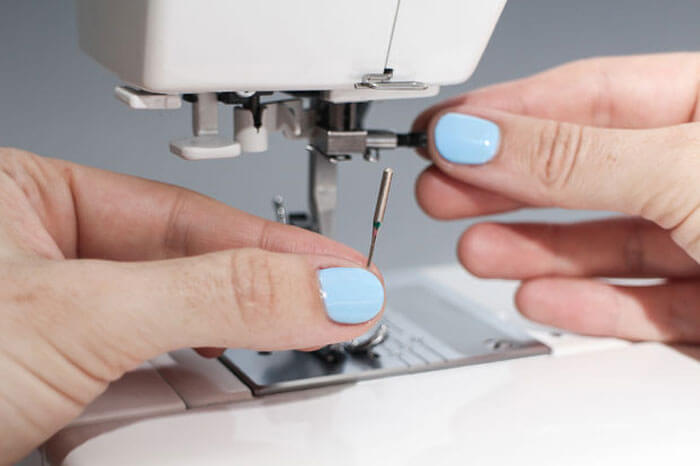
Find the needle in your machine. Take a screw driver or any tool that would fit the screw that is present at the top of the needle. Unscrew it. Make sure you hold the needle while u remove the screw else there are high chances of the needle to fall inside your machine.
Step 2
Pull down the needle once the screw is removed. Beware of the clamp.
Step 3

Insert the new needle and make sure the flat edge is pointing upwards and the sharp end is towards where you keep the fabric. Now push the needle inside the machine.
Step 4
Now it’s time to put the screw back into its place. Tighten the screw properly else it might leave the needle out of the clamp while stitching.
Step 5

Put the thread into the needle and don’t forget to do it from the front side not from the back.
And you are done!! All set for sewing.
Final Words
We have seen a brief explanation about the type of needles that has to be used in accordance to the fabric and how to change the sewing machine needle. Hope this post helps when you change the needle in your sewing machine next time. “A stitch in time saves nine” so keep in mind to change your needle in time before it creates any trouble. Happy sewing!
Related This :

Leave a Reply